Procedural Map Generation with Binary Space Partitioning


When creating a classical Rogue-like and for many other dungeon based games as well, the levels of the game are procedurally generated. This is so that each play through of the game offers the player a new experience - no two games are the same. There are many different algorithms based on the type of game and style of dungeon you're aiming to create. In todays post I'm going to walk through implementing a Prodcedural Dungeon Generator using the Binary Space Partitioning algorithm to create maps like the one pictured below, so If that's your thing then let's get to it.

The Basic Idea
Binary Space Partitioning works by repeatedly subdividing a rectangle until reaching some threshold, such as minimum room size, number of divisions, etc. The partitioning is done top-down, starting with a rectangle comprising the entire area to be partitioned. We flip a coin to decided if we should split the space vertically or horizontally. When we choose the place to split, be it horizontal or vertical, we want it to to be slightly off-centered instead of splitting evenly to create more variety in the room sizes generated.
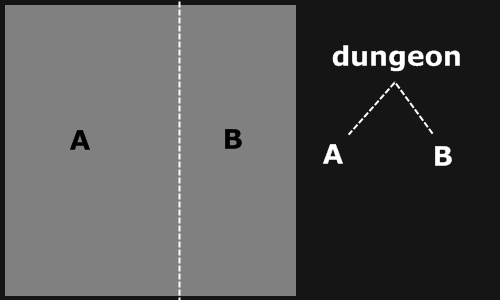
(Image borrowed from RogueBasin, see bottom)
Once the area has been partitioned into two pieces, we then repeat the process on each piece, continuing to recur until meeting our threshold to stop. We can split randomly at each level, flipping a coin to decide which way to split, or we can choose deterministically, alternating direction at each level.
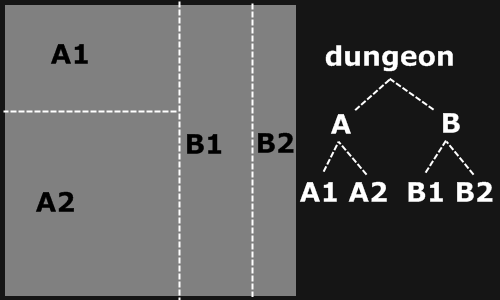
At each iteration, the new rectangles formed become nodes in a datastructure called a Binary Space Partitioning Tree. Each rectangle is represented by a pair of x/y coordinates representing the upperleft and bottom right corners of the rectangle the node represents, this is also sometimes referred to as a "bounding box".
struct Point {
    int x, y;
    Point(int X, int Y) : x(X), y(Y) { }
};

struct Room {
    Point upperLeft;
    Point bottomRight;
    Room(int ulx = 0, int uly = 0, int brx = 0, int bry = 0) : upperLeft(ulx, uly), bottomRight(brx, bry) { }
    int height() { return bottomRight.y - upperLeft.y; }
    int width() { return bottomRight.x - upperLeft.x; }
};
In addition to the bounding box, each node also contains a flag indicating if it was split from its parent on the vertical or horizontal axis. Finally, as BSP Trees are a type of binary tree each node has pointers to it's left and right child, or null pointers in the case of leaf nodes.
struct BSPNode {
    Room room;
    bool splitOnVert;
    BSPNode* left;
    BSPNode* right;
    BSPNode(int ulx, int uly, int brx, int bry, bool splitVertical) : room(ulx, uly, brx, bry) {
        splitOnVert = splitVertical;
        left = nullptr;
        right = nullptr;
    }
};
Having discussed the BSP tree data structures, lets turn our attention to the map.
The Map Structure
Our dungeon is going to be generated inside of our Map data structure. The map is a grid, represeted as a 2-dimensional vector of Tile Objects. Each Tile Object represents an x/y point on the map grid, and can be either a "blocking tile" or "non-blocking". Blocking tiles make up the parts of the Map the player and other entities cannot traverse, while "walkable" areas are made up of non-blocking tiles.
class Tile {
    private:
        int x;
        int y;
        bool blocking;
        int d_dst;
        sf::Color color;
    public:
        Tile(int sx = 0, int sy = 0, sf::Color col = sf::Color::Black);
        void render(sf::RenderTexture* texture);
        Tile& setBlocking(bool state);
        bool isBlocking();
        int getX();
        int getY();
        int getDist();
        Tile& setDist(int dist);
        Tile& setColor(sf::Color col);
        sf::Color getColor();
};
The Map object is very much just a wrapper aroud the grid of Tiles, with a few helper methods to keep things concise. Tiles are mainly interacted with through the getTile() method which returns a reference to the tile located at the provided coordinates.
class Map {
    private:
        int MAX_WIDTH;
        int MAX_HEIGHT;
        vector<vector<Tile>> tiles;
    public:
        Map(int mw = 100, int mh = 80);
        void setTile(Tile& tile);
        Tile& getTile(int x, int y);
        void render(sf::RenderTexture* texture);
        bool canStep(int x, int y);
        int getHeight();
        int getWidth();
};
With that out of the way, lets turn this grid into a dungeon.
Implementing a Dungeon Generator Using BSP
Generating the dungeon for our map takes place in two major phases:
1) The top-down creation of the BSP tree, during which the map is subdivided into smaller and smaller areas to be used as the maps rooms.
2) The bottom-up creation of the actual rooms and the tunnels which connect them, which is accomplished with a post order traversal of the BSP tree created in the first phase.
class DungeonGenerator {
    private:
        int maxRooms;
        using link = BSPNode*;
        link root;
        void init(Map& map);
        void clearRoom(Map& map, Room room);
        void connectChildren(link node, Map& map);
        link splitVertical(link node, int depth);
        link splitHorizontal(link node, int depth);
        link split(link node, int depth);
        void traverse(link node, Map& map);
        bool isleaf(link node);
    public:
        DungeonGenerator();
        void createRooms(Map& map);
};
The first step in creating our map layout is to completely blank out our grid, by setting every tile to the blocking state. Once the map is initialized, we can begin constructing the BSP tree.
void init(Map& map) {
       for (int ty = 0; ty < map.getHeight(); ty++) {
          for (int tx = 0; tx < map.getWidth(); tx++) {
             map.getTile(tx, ty).setBlocking(true);
         }
     }
}
Creating the BSP Tree
Construction of the BSP tree begins by initializing the root node of our BSP tree. The root node contains the bounding box for the rectangle outlining the entire map grid. We set the split flag randomly for the root node, as can be seen in the constructor for the root node. With our root node created, we begin subdividing our map with a call to split().
void createRooms(Map& map) {
       init(map);
       root = new BSPNode(0, 0, map.getWidth(), map.getHeight(), (rand() % 2 == 0));
       root = split(root, 1);
       rn = 1;
       traverse(root, map);
}
The split method is depth limited, stopping the splitting once we've split each space four times. This is far from the only way to decided on how much to split the area, its just the simplest. It also has the benfit of being deterministic. Using the splitOnVert flag we call either splitVertical or splitHorizontal on the node.
link split(link node, int depth) {
       if (node != nullptr && depth < 5) {
           if (node->splitOnVert) {
               node = splitHorizontal(node, depth);
           } else {
               node = splitVertical(node, depth);
           }
       }
       return node;
}
A non-deterministic version which uses room size instead of depth to decide on splitting can be implemented as follows:
BSPNode* DungeonGenerator::split(link node) {
    if (node == nullptr)
        return node;
    if (rand() % 2 == 0 && node->splitOnVert && node->room.width() >= 2* MAX_ROOM_WIDTH) {
        node = splitHorizontal(node);
    } else if (node->room.height() >= 2* MAX_ROOM_HEIGHT) {
        node = splitVertical(node);
    } else if (node->room.width() >= 2* MAX_ROOM_WIDTH) {
        node = splitHorizontal(node);
    }
    return node;
}
Regardless of which version you use, the actual splitting of the node takes place in the splitVertical and splitHorizontal method. Once the space has been divided, we call the split() method on each of the newly created child nodes, and if using depth limiting, incrementing the depth counter by one in the process.
link splitVertical(link node, int depth) {
       int m = (node->room.height()/2) + node->room.upperLeft.y;
       if (rand() % 2 == 0) {
               m += node->room.height()/8;
       } else {
               m -= node->room.height()/8;
       }
       node->left = new BSPNode(node->room.upperLeft.x, node->room.upperLeft.y, node->room.bottomRight.x, m, true);
       node->right = new BSPNode(node->room.upperLeft.x, m, node->room.bottomRight.x, node->room.bottomRight.y, true);
       node->left = split(node->left, depth+1);
       node->right = split(node->right, depth+1);
       return node;
}
link splitHorizontal(link node, int depth) {
       int m =  (node->room.width()/2) + node->room.upperLeft.x;
       if (rand() % 2 == 0) {
           m += node->room.width()/8;
       } else {
           m -= node->room.width()/8;
       }
       node->left = new BSPNode(node->room.upperLeft.x, node->room.upperLeft.y, m, node->room.bottomRight.y, false);
       node->right = new BSPNode(m, node->room.upperLeft.y, node->room.bottomRight.x, node->room.bottomRight.y, false);
       node->left = split(node->left, depth+1);
       node->right = split(node->right, depth+1);
       return node;
}
As can be seen, splitVertical and splitHorizontal are very similar, the only difference being that splitVertical splits the bounding box on the X axis while splitHorizontal splits its along the Y axis. With our tree complete, we can now start creating the rooms from it.
Creating the Rooms
Once we've have reached our desired amount of partitioning we are ready to create the actual rooms. This is done using the clearRoom() method, which sets the tiles in the given nodes bounding box to non blocking. Crucially, we only call this method on the leaf nodes as those are the rooms split to the desired sizes.
bool isleaf(link node) {
       return node != nullptr && node->left == nullptr && node->right == nullptr;
}
void traverse(link node, Map& map) {
       if (node == nullptr)
           return;
       if (isleaf(node)) {
           clearRoom(map, node->room);
       } else {
           traverse(node->left, map);
           traverse(node->right, map);
           connectChildren(node, map);
       }
}
When clearing the tiles for the room, we use a variable amount of "padding" on the border of the rooms to aid in giving each room a less uniform and more "organic" look.
void clearRoom(Map& map, Room room) {
      int xpad = (rand() % 2) + 1;
      int ypad = (rand() % 2) + 1;
      for (int ty = room.upperLeft.y+ypad; ty < room.bottomRight.y-ypad; ty++) {
          for (int tx = room.upperLeft.x+xpad; tx < room.bottomRight.x-xpad; tx++) {
                  map.getTile(tx, ty).setBlocking(false);
          }
      }
}
At this point, we are left with a map full of variously sized, disconnected rooms. This obviously isnt much good, so we have to do a bit more work to turn our rooms into a map.
Connecting the Rooms
We processed the leaf nodes to creat the nodes, we will use the internal nodes to turn our disjoint map into a connected graph. The rooms are connected using the connectChildren() method on each internal node. It find the center point of the left child and the center point of the right child, and creating a "tunnel" of non-blocking tiles between the points.
void connectChildren(link node, Map& map) {
        //Get center of left child
        int lmx = (node->left->room.upperLeft.x + node->left->room.bottomRight.x) /2;
        int lmy = (node->left->room.upperLeft.y + node->left->room.bottomRight.y) /2;
        //Get center of right child
        int rmx = (node->right->room.upperLeft.x + node->right->room.bottomRight.x) /2;
        int rmy = (node->right->room.upperLeft.y + node->right->room.bottomRight.y) /2;
        if (node->splitOnVert) {
            //create horizontal passages
            for (int x = lmx; x <= rmx; x++) {
               map.getTile(x, lmy).setBlocking(false).setColor(sf::Color::Blue);
               map.getTile(x, lmy+1).setBlocking(false).setColor(sf::Color::Blue);
            }
       } else {
          //create vertical passages
          for (int y = lmy; y <= rmy; y++) {
               map.getTile(rmx, y).setBlocking(false).setColor(sf::Color::Blue);
               map.getTile(rmx-1, y).setBlocking(false).setColor(sf::Color::Blue);
            }
       }
}
And with the rooms connected, we now have our connected map:

Well, there you have it: Procedural Dungeon Generation using Binary Space Partitioning. Until next time, Happy Hacking!
Further Reading
1) https://www.roguebasin.com/index.php/Basic_BSP_Dungeon_generation
-
Resolving Shift/Reduce Conflicts With Operator Precedence
-
Squeezing DFAs with Pair Compression
-
Designing Abstract Syntax Trees: Homogenous vs. Heterogenous Node Structures
-
From LR Items to LR States
-
Calculating Follow Sets of a Context Free Grammar
-
Streaming Images from ESP32-CAM for viewing on a CYD-esp32
-
Constructing the Firsts Set of a Context Free Grammar
-
Inchworm Evaluation, Or Evaluating Prefix-Expressions with a Queue
-
Data Structures For Representing Context Free Grammar
-
A B Tree of Binary Search Trees
Leave A Comment
Other Readers Have Said:
By: On:
While this is a great dungeon generator, how do I make it snap to grid?